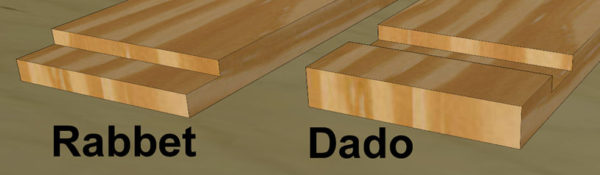
A dado is a square or rectangular slot cut from one end of a board to the other, and technically it goes across the grain, while the slot is called a groove if it goes with the grain.
However, many times this is still referred to as a dado.
A stopped dado is when the slot doesn’t extend to the end of the board. This should be done with a plunge router only.
A rabbet is when that slot runs off the end or the edge of the board.
You can use a dado blade set to cut most dados, grooves, and rabbets (click here to see the dado set I personally use).
This allows you to cut it in one pass.
Be sure to test your final blade width by cutting scrap material first, and checking that the final dado is perfect.
You can also cut dados, grooves, and rabbets with your regular blade.
This is handy when you only have a few to cut, and it may not be worth the time to set up and test your dado blade set.
When using a regular blade, you’ll make multiple passes between 2 marks to create the groove, slightly moving the fence over with each cut.
When cutting dados and rabbets across a wide board (when it would be unsafe to use the fence), you’ll need to use your miter gauge with an auxiliary fence attached to it.
This will better support the work piece as it passes over the blade.
This auxiliary fence can be a straight piece of plywood, mdf, or solid wood. Make sure it’s securely attached to your miter gauge so it will stay at a right angle to the blade thru the entire cut.
When cutting grooves along the length of the board, use your fence as normal. For rabbets, you’ll want to build a sacrificial fence.
This can be as basic as attaching a board to the side of your main fence.
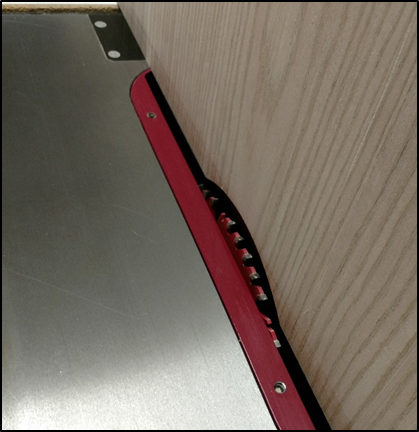
Once the sacrificial fence is created, position it directly above the saw blade with the blade lowered into the table.
Be sure your actual fence is not in any danger of getting into the blade.
Turn the table saw on and slowly raise the blade into the sacrificial fence, until the cut-away material is higher than what you’ll need to cut the rabbets.
You should do this a few times, going into the fence a good 1/4” (6mm).
Now when you run the work piece along the fence, part of the blade will be under the fence, and the cut will run off the edge of the board.
This creates the rabbet.
To see more basic techniques for using your table saw, check out:
Table Saw 101
Related
Pocket Hole Joinery
How to Use A Miter Saw