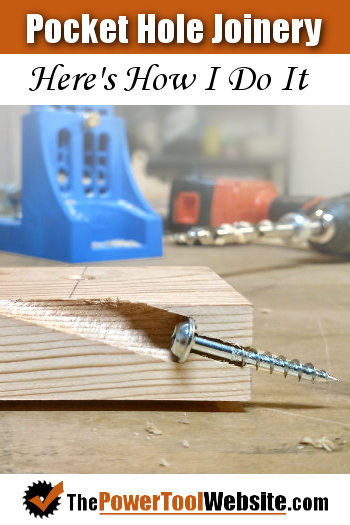
Pocket joinery has been around a long time, and still to this day you find woodworkers on both sides of the aisle, as far as considering it a real woodworking joinery technique. I feel like it really comes down to the individual and their own personal preference on whether or not it’s ok to use metal in woodworking (like screws, brads, fasteners, etc…)
There have been tests done on various types of joints, and as far as strength goes, pocket joints (if done properly) are very strong. They don’t offer the same strength as say a mortise and tenon joint, but still very strong nonetheless.
That’s all fine and great, but is joint strength really the only thing that matters?
The simple answer is no. While for most applications, sufficient strength is there when using pocket joinery. But really it comes down to practicality, available tools and skills, and again – personal preference on using metal with wood. Especially if the joint can be done in discreet locations, or maybe even plugged to give it a decorative touch.
However, on the flip side, if you don’t really like using metal in your projects, or if you think pocket holes are really ugly (this is kind of where I fall), then you’ll probably feel better about your final results of any project if you go with another type of joinery. But even still, there will be exceptions.
Whether you like pocket holes or you don’t, you can’t deny the fact that pocket hole joinery is
- Fast
- Easy
- Beginner friendly
- Long-lasting
- Strong enough
In case you’re wondering, here are some applications where I personally use pocket hole joinery:
- Shop jigs
- Shop furniture
- Rustic furniture (discreetly)
- Table tops / panels (with glue)
- Breadboard Ends
The only reason I may use pocket joinery on panels is because they are very well hidden on the underneath or back side of a project. But even then, it’s only in certain situations I’m comfortable using screws, and as a reinforcement for the glue.
Another reason I may support this type of joinery is because I’m in a hurry and don’t want to spend the time to clamp after a glue up. So then I’ll glue the project like usual, and use pocket screws to hold it together and eliminate clamping. Then I get the benefits of a strong glue joint, and the pocket-screw reinforcement, all without waiting on the glue to dry before moving on to the next step. For instance, I did this when attaching part of my base molding to my computer desk, and no one will ever know it (except every one on the internet now).
So in this article, I’m going to assume you are kind of like me, or maybe even more on the side of favoring pocket joinery. I mean, you’re here reading this article about pocket joinery right?
The Kreg Jig – It’s All The Rage
Kreg K4 vs. The Mini
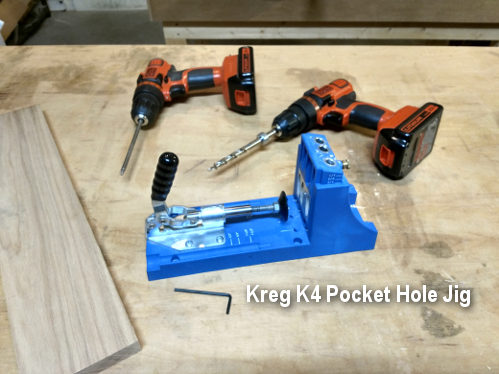
In comes everybody’s favorite pocket hole jig – The Kreg Jig. I got my start with Kreg using their mini pocket screw jig, and it has it’s place. But once I upgraded to the K4 jig, I put my mini away in a drawer, and probably only pulled it out since then 3 or 4 times. Allow me to explain the difference…
The K4 uses a platform with an adjustable fence and clamping system. Once these are set, you can easily and quickly make duplicate pocket holes, in multiple boards, simply by working the clamp to lock in the board and to release the board when done. The K4 has 3 drill-bit guides, making it possible to drill multiple pocket holes without moving the board.
When clamped, you simply drill the pocket hole using these bit guides, with the special stepped drill bit that comes with the jig. Then unclamp, slide the board down, and repeat. Or remove the board, place the new board, clamp and repeat.
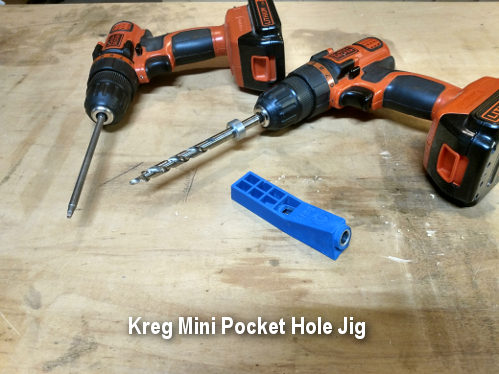
The Kreg Mini-Jig clamps onto the board using a vice clamp (or any quick clamp), and depending on how thick the stock is, you may have to measure the distance from the edge of the board, and clamp it in place just right. It’s only got 1 drill bit guide hole.
If you’re repairing a piece of furniture, the Mini-Jig is really handy, as it’s smaller and easier to get it set up in tight spaces.
But if you’re building new furniture, chances are you need to make quite a few pocket holes, and the Mini-Jig setup get’s incredibly time-consuming.
Using the Kreg K4 Pocket Hole Jig (or the new K5)
Pocket Hole Screws – Decisions to Make
First thing you’ll need to figure out is your screw type and size. Pocket screws have a special flat head that seats firmly on the shoulder left in the pocket hole by the stepped drill bit. Also, the screw uses a square bit driver, making it easier to drive in than if it were philips.
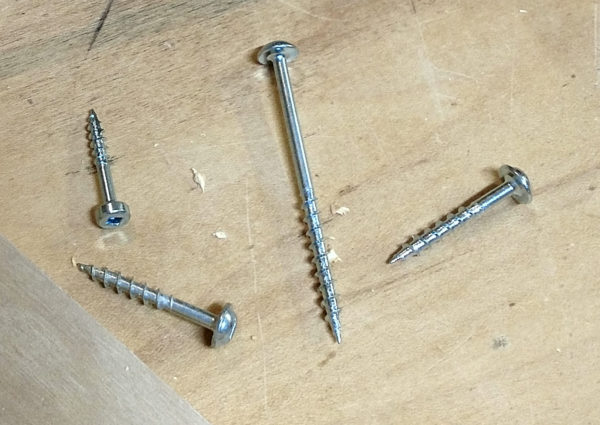
As far as the length of screw, Kreg has a pocket screw selection chart that shows you exactly which screws go with the various board thicknesses. But for example, 3/4″ stock requires pocket screws that are 1-1/4″ (32mm) long. And this is mostly what I work with, so I keep this size of pocket screw in large quantities.
The screw type (at it’s most basic level) is either coarse thread or fine thread. Really you just need to plan on using coarse thread with soft woods and plywood, and use fine thread if working with hard woods.
There are other options, like zinc coated, stainless, etc… These choices matter when you consider where the furniture is going. For indoor projects, use the basic zinc coated screws, as they are cheaper and still plenty strong. For outdoor furniture, get the special coated kind, or the stainless.
Kreg Jig Setup for Pocket Hole Joinery
There are 3 things you need to setup prior to drilling pocket holes for any given board thickness. These take very little time, and may rarely be adjusted if you commonly work with the same thickness boards.
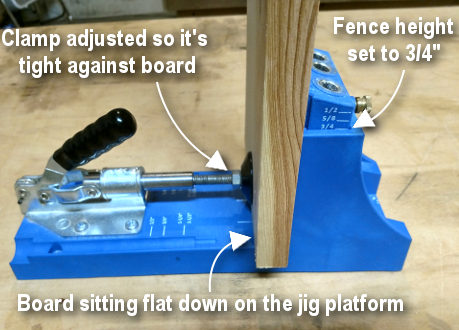
1 – Fence height on the jig itself. This is really easy, you just loosen the set screw and adjust the fence to the line indicating the thickness of the board being drilled into. See above, I’ve set the fence to 3/4″. (And all of this is for nothing if you don’t make sure the board is sitting flat down on the jig platform, remember that when clamping)
2 – Clamp position – You put the board against the fence, engage the clamping mechanism, then tighten the clamp head until it touches the board. Then disengage the clamping mechanism, and tighten the clamp head a bit more. Now when you re-engage the clamp, it should apply pressure against the board. You just need enough pressure here to keep the board from sliding back and forth.
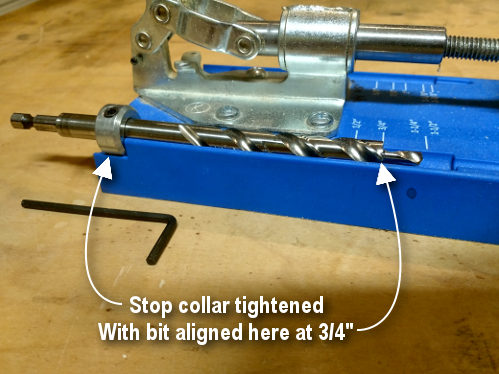
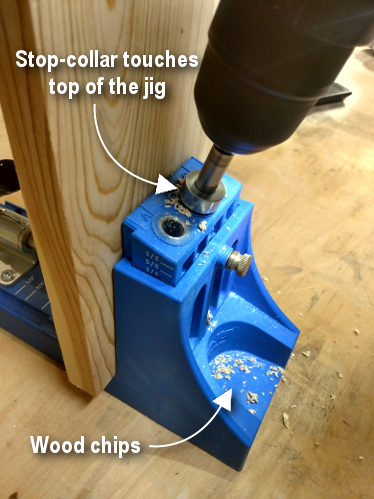
3 – Stop-collar on the stepped drill bit. This is done with an allen wrench. There’s a recess along the edge of the jig that perfectly fits the drill bit. There are lines indicating where to set the bit, with the collar at one end, and the step of the bit at the line. This is where you’ll tighten the collar.
The Jig Is Set – Now Drill The Holes
With your hole locations marked on the board, line them up while clamping with the indicator marks on the base of the jig (showing you the center line of the holes you’re about to drill). Once clamped, you can then drill however many pocket holes (1,2, or 3) you need at this location before unclamping.
While drilling the pocket hole, keep the drill at full speed. As you insert the bit into the guide, let the guide do it’s job and keep the bit in line. Be careful to not apply pressure that pushes the bit out of this alignment, as that can be hard on the bit and the bit-guide.
If you attach a shop vac on the jig, your wood chips will do a pretty good job of staying clear. But the shop vac is not required. I rarely use one, and I just make sure to lift the bit out of the hole a few times while drilling, just enough to sling out some of the wood chips. This helps to keep the bit from getting clogged (which causes heat and dulls the bit).
You’ll want to drill down until the stop-collar touches the top of the fence, then move on. When sliding the board over, or putting the next board in the jig, you may want to blow the wood chips away off of the jig platform. Otherwise they can create a gap under the board and affect the depth of the pocket hole.
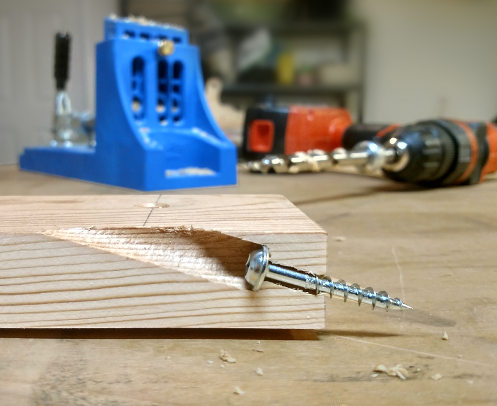
The Holes Are Drilled – Now Insert The Screws
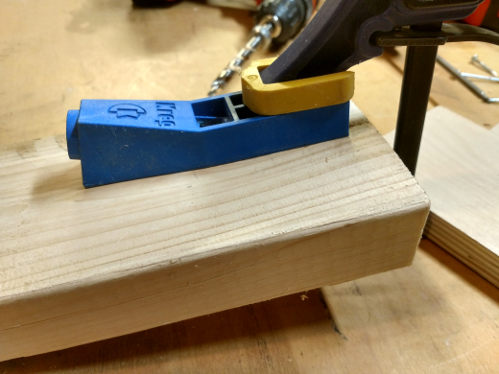
The first step with assembly is getting the clamps set up. Because of the 15 degree angle of a pocket screw, it has a tendancy to pull one piece along the other, which leaves a ledge in the joint.
To keep this from happening, clamp the pieces in a way that they cannot slip when tightening. Here’s an example of how I clamped the pieces when making a mitered picture frame with pocket joinery:
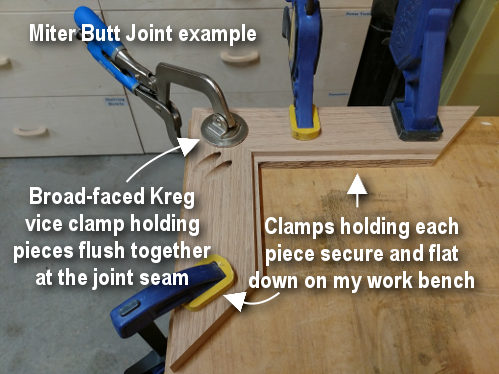
You can see the above picture frame project tutorial here (opens in a new window).
A good pocket joint requires a tight pocket screw, but not so tight you strip the hole out. This means there’s a point when it’s not quite tight enough, there’s another point that’s kind of like, oh crap that’s too much, and then there’s the sweet spot somewhere in between. It’s your job to find that sweet spot.
Some people will tell you to set your drill’s clutch a certain way. But I can tell you it’s not going to be the same with every board, which is why I don’t even bother with the clutch. Instead I set my drill to drill (no clutch), and I slowly insert the screw until my drill just starts to bog down. Normally this is when you would pull in the trigger more, but with pocket screws that would be a mistake.
This comes naturally after you’ve done several and know what it should feel like. But when starting out, it’s more about trial and error.
Start out by tightening the screw until you can clearly see it pull the gap closed. If you want, you can grab both boards and twist and pull, see if there’s any play. You’ll definitely have a little bit of rotation with the boards since there’s only 1 screw in place, but it should have some good drag and not be too loose.
If there’s any real play at this point, or it can pivot and rotate easily, you’ll want to go tighter. Snug it up until it feels good and secure, without really driving it in.
And don’t use an impact wrench! Doing this is just asking to strip it out.
Now drill the remaining screws so they feel like they’re at the same tightness as the first. After they’re all in, the joint gap should be nice and tight, with no play and the joined pieces should feel like a single solid assembly.
Tips and Tricks When Doing Pocket Hole Joinery
1 – Don’t get too close to the ends of the boards with your pocket holes when doing a panel, especially if you still need to trim off these ends after they’re all together. I usually stay about 3 inches from the ends at this point.
2 – There are different opinions out there, but typically when using pocket joinery along the edge of a board, you’ll want to space them roughly 6 to 8 inches apart. The main thing is to get one at each end (Kreg suggests at 2″ from the edge), then space the pocket holes in between these 2 in a way that they’re somewhere around 6 to 8 inches apart.
3 – Never do only 1 pocket hole to connect 2 boards, as this creates a natural pivot point without locking the boards in place. The only time you may be able to get away with this is if you’re constrained on space (maybe with a picture frame), and you are using the pocket screw to reinforce a glued joint.
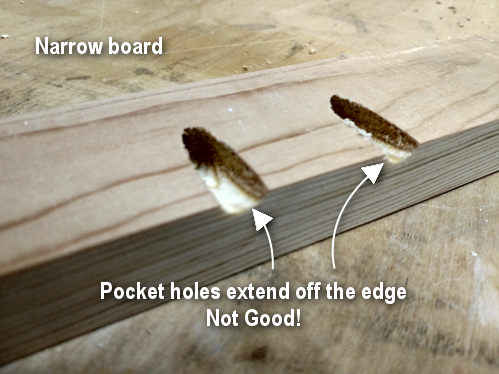
4 – Take note of the space needed to create the pocket hole. When drilling into 3/4″ stock, you’ll need to have 2-1/4″ of board width, if you have less than that your pocket hole will extend off the edge of the board.
5 – When pocket joining miters, if the width of the boards are 3 inches, you can use holes A and C. If it’s less than 3 inches but over 2-3/8″, you’ll want to use B and C.
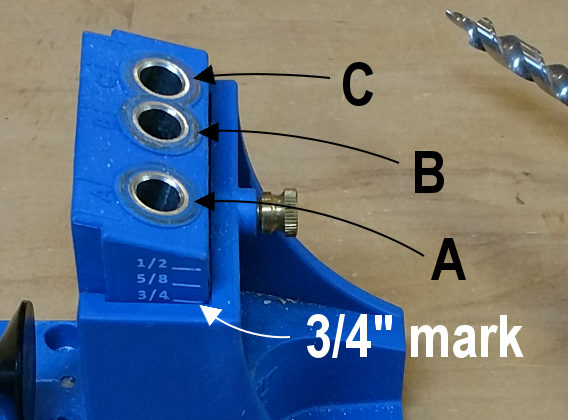
6 – Pocket hole joinery at the ends of narrow boards, like rails stiles and aprons, will only need 2 pocket screws. Use the widest 2 holes you can get away with, while keeping the pocket-hole-centers within 3/8″ from either edge.
7 – If you ever strip out a pocket hole, it’s not ruined necessarily, here’s what you do. Remove the screw, cut a couple tooth picks in half, put a small bit of glue in the stripped hole, and then shove in the tooth picks. Now you can reinsert the screw and it should hold good.
8 – If you having issues with the wood splitting, try backing the screw out half way thru to clear the wood fibers before finishing. Also put some paste wax on the threads of the screw to lubricate them.
9 – To fill the holes without buying the ‘plug maker’, or buying the pre-made overpriced bag of kreg plugs, you can use any 3/8″ dowel stock. Just apply some glue, push in the dowel, then saw it off flush. Sand it down to make smooth.


That’s It – Now You’re Ready
There may be some parts of this process that you really just need to get some hands-on experience to fully grasp, but I think you can see that the process is not tough at all. It’s a very basic woodworking joint and like I said before, it has it’s place in many wood shops and woodworking projects.
Be sure to sign up below to get more tips and projects sent to your inbox!
Related:
Common Types Of Wood Screws and Pre-Drilling Explained
Kreg Jig 320 Complete Review
Mitered Pocket Hole Picture Frame Tutorial